
Do you want to Know How to Change a Dewalt Miter Saw Blade? Before I present you the right answer you should follow the rules below to change a miter saw.
1. Turn off your Dewalt miter saw and disconnect it from the power source.
2. Loosen the blade bolt with a wrench and remove the old blade.
3. Insert the new blade into the housing, making sure that the teeth are facing in the correct direction.
4. Tighten the blade bolt to secure the new blade in place.
Now you follow the techniques :
- Unplug your saw from the power source
- Raise the blade to its highest position using the adjustment knob on the front of the saw
- Loosen the arbor nut on the side of the blade with a wrench and remove it completely
- Pull the old blade off of the arbor shaft and discard it safely
- Install your new blade onto the arbor, making sure that it is installed correctly (the teeth should be pointing in the correct direction)
- Tighten down the arbor nut until it is snug, but don’t over-tighten it as this can damage both your blade and your saw
- If your new blade has an adapter ring, make sure that this is also installed correctly before tightening down
How to Change a Mitre Saw Blade | Dewalt Chop Saw Blade Change | DWS779
How Do You Change the Blade on a Dewalt 20V Miter Saw?
There are a few different types of Dewalt 20v miter saws, so the blade changing process will vary slightly depending on which model you have. However, the general process is relatively simple and can be done in just a few minutes.
To start, you’ll need to remove the old blade from the saw.
To do this, first loosen the blade clamp screw with a hex wrench. Then, slide the old blade out of the clamp and discard it. Next, you’ll need to install the new blade.
Start by inserting the new blade into the clamp, then tighten the clamp screw until it’s snug. Be careful not to overtighten, as this could damage the clamp or strip the threads. Once the new blade is installed, you can reattach any guards or covers that were removed during blade changing process.
And that’s it! You should now be ready to resume using your Dewalt 20v miter saw with a brand new blade.
How Do You Change a Dewalt Blade?
Assuming you’re talking about a Dewalt circular saw: To change the blade on your Dewalt circular saw, first make sure that the power is off and the blade has stopped spinning. Then, use the wrench that came with your saw to loosen the bolt that holds the blade in place.
Next, remove the old blade and insert the new one, making sure that it is facing in the correct direction.
Finally, tighten the bolt back down and you’re ready to go!
How Do You Remove a Dewalt Saw Blade?
If you need to remove a Dewalt saw blade for any reason, follow these steps:
1. Unplug the saw from its power source.
2. Use a wrench to loosen the bolt that secures the blade in place.
3. Carefully remove the blade from the saw. Be careful not to touch the sharp edges of the blade.
4. If necessary, clean the area around the bolt hole with a brush or other tool before replacing the blade.
How Do You Change the Blade on a Dewalt Dw715 Miter Saw?
If you’re looking to change the blade on your Dewalt DW715 miter saw, there are a few things you’ll need to keep in mind.
First, you’ll need to make sure that the new blade is compatible with your saw.
Secondly, you’ll need to be very careful when changing the blade, as it is very easy to damage the saw if done incorrectly.
Here are instructions on how to change the blade on a Dewalt DW715 miter saw:
1) Unplug the saw from any power source and remove the battery (if applicable).
2) Loosen the clamping bolt located at the front of the throat plate with a wrench.
This will allow you to remove the throat plate.
3) Remove any debris or wood chips from around the arbor nut before loosening it with a wrench. Be sure not to over-tighten this nut when replacing it later.
4) With the arbor nut loosened, pull out the old blade and dispose of it properly. Inspect both sides of the inside of your throat plate for any damage that may have occurred during use with old blade – if necessary, clean or replace throat plate at this time.
Credit: thearchitectsdiary.com
Changing Blade on Dewalt 10 Inch Miter Saw
If you own a Dewalt 10 inch miter saw, then at some point you will need to change the blade. This is not a difficult task, but there are a few things that you need to know before you get started. In this blog post, we will walk you through the steps of changing the blade on your Dewalt 10 inch miter saw.
Before you begin, make sure that the power to the saw is turned off and that the blade is completely stopped. Next, use the wrench that came with your saw to loosen the bolt that holds the blade in place. Once the bolt is loosened, you can remove the old blade from the saw.
Now it’s time to install the new blade. First, make sure that it is positioned correctly on the arbor. Then, use your wrench to tighten down the bolt until it is snug.
Be careful not to overtighten – just snug is good.
Once your new blade is installed, you can power up your saw and start making cuts again!
Change Dewalt Miter Saw Blade Without Tool
It is definitely possible to change the Dewalt miter saw blade without using any additional tools. In fact, it can be quite easy to do if you know what you’re doing. Here’s a step-by-step guide on how to go about it:
1. Firstly, unplug the Dewalt miter saw from its power source and make sure that there is no power running through it. You don’t want to accidentally start the saw while you’re changing the blade!
2. Next, take off the throat plate of the saw by loosening the screws that hold it in place.
Once the throat plate is removed, you should be able to see the arbor nut which holds the blade in place.
3. Use a wrench to loosen and remove the arbor nut, and then carefully remove the old blade from the saw. Be careful not to touch the teeth of the blade as they are extremely sharp.
4. Now it’s time to install your new blade.
Dewalt Blade Change Tool
If you’re a fan of Dewalt tools, then you know that they make some of the best power tools on the market. One of their most popular products is the Blade Change Tool. This handy little tool makes it quick and easy to change out the blades on your Dewalt power saw.
Here’s a look at how it works and why it’s such a great addition to your tool box. The Dewalt Blade Change Tool is designed for use with all Dewalt circular saws. It allows you to quickly and easily change out the blade on your saw, without having to remove the entire unit from the work surface.
The tool comes with two different size hex keys, so you can choose the one that fits your particular model of saw.
To use the tool, simply insert the appropriate key into the blade release hole and turn it counterclockwise until the blade pops out. Then, insert the new blade and tighten it in place by turning the key clockwise.
The whole process takes just seconds and requires no special skills or knowledge. The Dewalt Blade Change Tool is a must-have accessory for anyone who owns a Dewalt power saw. It makes blade changes quick and easy, so you can get back to work as soon as possible.
If you don’t already have one, be sure to pick one up next time you’re at your local home improvement store or online retailer – you won’t regret it!
Dewalt Dcs777 Blade Change
Whether you’re a professional contractor or a passionate DIYer, the DeWalt DCS777 is a versatile saw that can handle a variety of tasks. But like all power tools, it eventually needs some maintenance. One of the most common maintenance tasks is changing the blade.
If you’ve never changed the blade on a power saw before, don’t worry – it’s actually pretty easy. Just follow these simple steps and you’ll have your new blade installed in no time.
First, unplug the saw from its power source and make sure that there is no tension on the blade.
Then, use the wrench that came with your saw to loosen the arbor nut. Once the nut is loose, you can remove the old blade by pulling it off of the arbor shaft.
Next, take your new blade and align it with the arbor shaft.
Make sure that the teeth are pointing in the correct direction (toward the front of the saw) before you attempt to install it.
How to Change Blade on Dewalt Miter Saw Dw713
If you’re a homeowner or a do-it-yourselfer, chances are you’ve got a miter saw in your tool arsenal. Miter saws are versatile tools that can be used for everything from trimming lumber to cutting baseboards and crown molding. And while they’re relatively easy to use, there’s one thing that all miter saw users have to do at some point: change the blade.
Fortunately, changing the blade on a Dewalt miter saw is a relatively simple process. Here’s what you need to do:
1. Unplug the saw from its power source and make sure that it’s completely cool before proceeding.
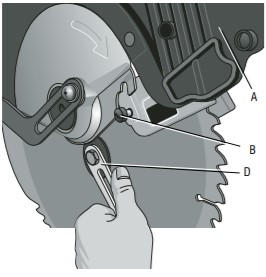
2. Raise the blade guard and hold it in place with your thumb . Then, use an Allen wrench to loosen the two screws that secure the throat plate (the metal piece surrounding the blade) to the saw table.Be careful not to lose these screws!
3. With the throat plate removed, you should now be able to see the arbor nut . Use an adjustable wrench or socket wrench to loosen this nut until it’s loose enough to turn by hand.
4. With the arbor nut loosened, you can now remove the old blade from the saw . Simply pull it off of the arbor shaft and set it aside.
5. Installing a new blade is simply a matter of reversing these steps. First, slide the new blade onto the arbor shaft so that its teeth are pointing inwards towards the center of the shaft.
Then tighten down the arbor nut using your wrench until it’s snug but still able to be turned by hand; don’t overtighten!
How to Change Blade on Dewalt Circular Saw
If you’re a homeowner, it’s likely that you own a Dewalt circular saw. And if you own a Dewalt circular saw, then you know that one of the most important parts of maintaining your saw is changing the blade. In this blog post, we’ll walk you through the steps of how to change the blade on your Dewalt circular saw, so you can keep your saw in top condition and avoid any accidents.
First, unplug your saw from the power source. Then, use the wrench that came with your saw to loosen the arbor nut. Once the arbor nut is loosened, you can remove the old blade by pulling it off of the arbor shaft.
Be careful when removing the old blade, as there may be sharp edges on it.
Next, take your new blade and align it with the holes on the arbor shaft.
How to Change Blade on Dewalt 12 Sliding Miter Saw
If you’re a handyman or woman, then you know that having a dependable miter saw is essential. And when it comes to miter saws, Dewalt is a brand that you can trust. Their 12″ sliding miter saw is one of the best on the market.
But like all tools, it will eventually need some maintenance. One of the most common things that needs to be done is changing the blade. Here’s a step-by-step guide on how to do just that:
1) Unplug the saw from its power source and make sure that it’s completely turned off.
2) Raise the blade guard and secure it in place with the locking knob.
3) Use an Allen wrench to loosen the two bolts that hold the blade in place. Be careful not to lose these bolts as they are small and easy to misplace.
4) Remove the old blade and discard it safely. You may want to wear gloves during this process as old blades can be sharp and dangerous.
5) Insert your new blade into the saw, making sure that it’s installed correctly (the teeth should be pointing downwards).
6) Tighten down the two bolts until they’re snug but don’t over tighten them as this could damage the threads.
7) Lower the blade guard and make sure that it moves freely up and down without any interference from the new blade.
Dewalt Miter Saw Blade Change Tool
When it comes time to change the blade on your Dewalt miter saw, there is a special tool that is designed to make this process easier. The Dewalt Miter Saw Blade Change Tool is a must-have for anyone who owns one of these saws. This tool makes it simple to remove the old blade and install a new one without having to fuss with any screws or bolts.
Simply insert the tool into the blade slot and twist it to release the old blade. Then, insert the new blade into the same slot and twist the tool in the opposite direction to secure it in place. That’s all there is to it!
Conclusion
Most miter saws use a quick release lever to allow you to change the blade without having to remove the entire saw from the table. To change a Dewalt miter saw blade, first make sure that the power is off and the blade has stopped spinning. Next, squeeze the quick release lever to loosen the blade.
Then, remove the old blade by unscrewing it from the arbor. Finally, install the new blade by screwing it onto the arbor and tightening it with a wrench. Be sure to check that the blade is installed correctly before turning on your saw.